Setting up an
Apache-Webserver
from scratch
(For beginners)
|
 |
This page came out of the circumstance that a few people wanted
to know how to deal with the well known HTTP-Server. So I
thought, everyone should be able to participate. Please note:
this tut goes for installing on windows, since Linux/Unix-users
usually know what to do ;)
 Download
& Install
First, go to httpd.apache.org/download.cgi
 .
Search for the newest release, then for "Win32 Binary
(MSI Installer)". On the following page you'll find some
download-locations for "apache_2.0.48-win32-x86-no_ssl.msi"
(or any higher version in the future). Choose the one which
suits you. .
Search for the newest release, then for "Win32 Binary
(MSI Installer)". On the following page you'll find some
download-locations for "apache_2.0.48-win32-x86-no_ssl.msi"
(or any higher version in the future). Choose the one which
suits you.
Note that on this website also you'll find all eventually
needed (professional) FAQs and manuals needed, if you experience
any prob.
So, after downloading I DON'T recommend to install it AS
A SERVICE. Then you can start it manually every time needed.
Don't have it run ALL the time, since it could be one more
weak point in your internet-configuration, and take away
some bandwith and/or CPU-time. It isn't that bad, but if
someone scans your ports and find you running a webserver,
maybe he'll try to hack in.
The
Configuration
Now go to your installation-dir and into the CONF-folder
(i.e. "Program files\Apache2\conf\"). Edit the httpd.conf
with your favourite texteditor and read what the
apache-team has to say about the control-file for their
webserver. They inserted a huge bunch of comments,
beginning with #. They explain pretty much everything
needed for beginners and even advanced users. Extended knowledge
of a specific option or parameter could be acquired on the
Apache-website, if there is not enough info for you within
the comments, as said before.
After or while reading and editing your httpd.conf to meet
your environment and wishes, you can go on with this tutorial
here, in which I'll explain some
 Back to top
Essential
Parameters
-01- Main Config
ServerRoot - this is where you've installed your
apache. Should been inserted by the installer automatically.
Note, that in some cases within the configuration the familiar
way of writing backslashes "\" in directory names is replaced
by a slash "/"! I.e.: "C:/Program files" instead of "C:\Program
files". Note also, that if you plan to move the logfiles for
example to another location, you have to put the full path
to them in quotes! The following lines can be left at default
values, then we come to the parameter
-02- Listen
This defines on which port your webserver will be available
(default: 80). If you have full access to the internet or
are able to configure your router/firewall to forward a port
to a specifig computer in your LAN, you can nearly take any
portnumber you want (i.e. "666").
A valid line would look like this:
Listen 666
If you don't have full access or something like that is the
case, you may have to take port 80, as it is default and should
work in nearly every case. The following list of the LoadModules-directive
can be left at default values. After that, you have to change
-03- Various Paramteters
ServerAdmin admin@domain.com - you don't have to
provide a real address
ServerName yourredirect.no-ip.org:666 - you need a
dynamic
redirect  (i.e. no-ip.org
)
or a static IP
(i.e. no-ip.org
)
or a static IP
DocumentRoot "E:/Web/Apache-Root" - this is where your
files you want to provide go
Directory "E:/Web/Apache-Root"........ - same dir goes
here All others leave as defaults.
Btw: to reduce time needed loading the httpd.conf, just delete
all unneeded comment-lines, if you're familiar with them after
a little time.
But don't worry, there exists a file called httpd.default.conf,
where all comments are still viewable. Then we will come around
a line like this:
-03- IndexOptions
This line should be replaced with the following:
IndexOptions FancyIndexing VersionSort FoldersFirst NameWidth=*
DescriptionWidth=* SuppressLastModified
This lets the server create more flexible index-files (the
view of a directory you surely have seen on the web, beginning
with INDEX OF...) for your directories.
But that goes only for directories without an index.html-file
in it.
That's it for the configuration.
Maybe you have to change your startmenu-shortcut, since the
installer does something weird and adds an unneeded directory-location
to the server-root (which is set in the httpd.conf already)
into the shortcut. So you may delete it. I.e., the commandline
looks like this:
C:\Program files\Apache2\bin\Apache.exe -w -f "C:\Program
files\Apache2\conf\httpd.conf" -d "C:\Program files\Apache2\htdocs\"
You can change it to:
C:\Program files\Apache2\bin\Apache.exe -w -f "C:\Program
files\Apache2\conf\httpd.conf"
Conclusion
Hey, and that is it for now! :)
Congrats, your server should be now reachable under http://127.0.0.1:666/
(or whatever portnumber you set) and you should see the content
of the E:/Web/Apache-Root directory (or whatever... blah blah).
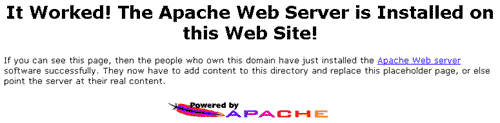
Or you can see the standard-page of apache:
Note: to shut down Apache nicely, just press CTRL+C
in the console-window and wait a few seconds.
If there are any more questions or ideas, please let me know!
Requirements: a PC (Pentium 100MHz is enough, I think) and
Windows98 SE would be nice.
Given the circumstance that you move your webserver's configuration onto a real domain or yet own a domain name, you may want to consider the following trick:
A further method to extend your webserver's capabilites and - more importantly - accessibility is the redirection of it's URLs via htaccess. With this method, all URLs that are called, i.e. http://lestarte.de, http://www.lestarte.de and http://lestarte.com, will be redirected to http://www.lestarte.com. As a plus this happens with a searchengine-friendly 301 (permanent) redirect - not with any ambiguous meta refreshs. Additionally, you automatically prevent duplicate content issues.
The creation of this ".htaccess" called file is sadly a not so easy task within Windows, because for Windows there is no real filename in front of the dot. As a workaround, with any texteditor you simply create a file with the following content, customized to your domain name:
                    RewriteEngine On
                    RewriteCond %{HTTP_HOST} !^www.\domain.\com [NC]
                    RewriteRule ^(.*)$ http://www.\domain.\com/$1 [L,R=301]
Then you save this code as "htaccess.txt".
Now you need to start a FTP-client, connect to your server and put this file into the main directory for your webspace (the so called root). After uploading you can rename this file on the server to ".htaccess". Then you can go forward and re-download it to your PC, which Windows accepts now without any complaints.
This new ".htaccess"-file is available for editing and saving as a normal file now, so you can delete your old htaccess.txt.
Back to top
|
|